Planning a bathroom remodel or new build means making smart choices about your fixtures, and few decisions impact daily use more than the tub-shower setup. A combined tub and shower layout offers flexibility for families, resale value for sellers, and efficient use of square footage in tight quarters. But cramming both into a small space without proper planning leads to awkward access, code violations, and expensive do-overs. This guide walks through the space requirements, proven layout configurations, and placement strategies that make tub-shower combinations work for real homes.
Table of Contents
ToggleKey Takeaways
- A combined tub and shower layout provides flexibility for families while maximizing resale value and meeting building codes with a single 30×60-inch clear floor space requirement.
- Standard alcove tub-shower units measure 60×30 inches, but planning for 36 inches of clearance and an 80-inch ceiling height ensures comfort and accessibility.
- Tub-shower combinations work best on exterior walls or shared wet walls to simplify plumbing and ventilation, with showerheads centered 30 inches from each end wall for optimal water coverage.
- Moisture barriers, proper blocking for grab bars, and accounting for tile thickness are critical details that prevent costly mold, structural damage, and safety issues.
- Correct ventilation sizing (80–100 CFM minimum for bathrooms with tubs) and strategic storage planning eliminate condensation problems and daily frustration in your bathroom layout.
Why Choose a Combined Tub and Shower Layout
A tub-shower combo serves multiple needs in one footprint, making it the workhorse of most full bathrooms. Families with young children need a tub for safe bathing, while adults prefer the quick efficiency of a shower. Installing both separately requires at least 10 to 12 linear feet of wall space plus dedicated plumbing rough-ins, a luxury most bathrooms can’t accommodate.
Resale value tilts heavily in favor of homes with at least one full tub. Real estate agents consistently report that buyers with children or pets pass on homes with shower-only setups, even if the home checks every other box. A tub also expands accessibility: elderly users or anyone recovering from surgery often can’t safely stand in a shower stall.
From a code and cost perspective, combining the two simplifies plumbing. The International Residential Code (IRC) requires a minimum 30×60-inch clear floor space in front of a tub, shower, or combo unit, you’re meeting that requirement once instead of twice. Drain lines, water supply risers, and shut-off valves all consolidate at a single wet wall, cutting material costs and reducing potential leak points down the road.
Essential Space Requirements for Tub-Shower Combinations
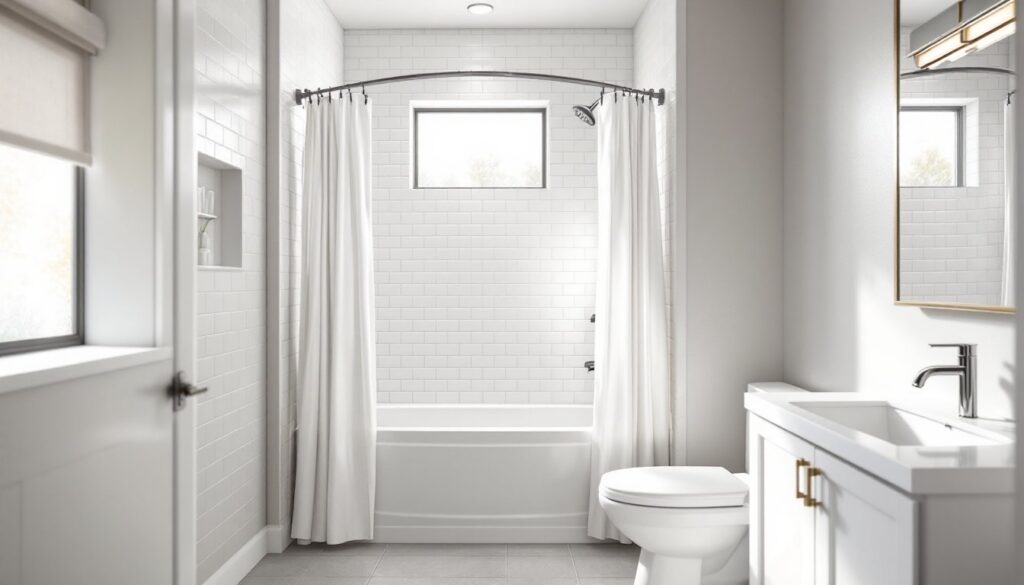
Standard alcove tub-shower units measure 60 inches long, 30 to 32 inches wide, and 60 inches high for the enclosure. That 60×30-inch footprint is the minimum for a functional setup, though it feels tight for anyone over six feet tall or broader-shouldered users.
The IRC mandates that 30×60-inch clear floor space in front of the tub, though this area can overlap with the toilet or vanity clearance. In practice, leaving 36 inches of clearance makes the bathroom far more comfortable and wheelchair-accessible if needed. Measure from the tub apron to the opposite wall or fixture, not from tile to tile, which eats into usable space.
Ceiling height matters more than most DIYers realize. Code requires a minimum 80-inch ceiling height over the tub-shower area, measured from the drain to the ceiling surface. Showerheads typically install at 78 to 80 inches above the floor, so a standard 8-foot ceiling works, but anything lower (common in basements or under-stair bathrooms) requires a recessed tub or creative grading.
Door swing and grab bar placement also factor in. If you’re installing a hinged shower door, it needs clearance to open fully, typically 22 to 24 inches, without hitting the toilet or vanity. Blocking for grab bars should be installed during framing at 33 to 36 inches above the tub rim, per ADA guidelines, even if you don’t mount the bars immediately. Retrofitting blocking later means tearing out tile and drywall.
Popular Bathroom Layout Configurations
5×8 Foot Standard Layout
The 5×8-foot bathroom (40 square feet) is the most common full-bath footprint in post-1980 construction. In this layout, the 60-inch tub-shower combo runs along one short wall, the toilet sits adjacent on a side wall, and the vanity occupies the opposite short wall or remaining side wall.
This arrangement keeps plumbing consolidated on one or two walls, minimizing pipe runs and simplifying venting. The toilet should sit at least 15 inches from its centerline to any side wall or fixture, per code, so in a 5-foot-wide room, centering it on a long wall gives the required clearance. The vanity typically spans 24 to 36 inches wide, leaving just enough space for a swing-in door (which should never swing over the toilet clearance zone).
One challenge: a 5×8 layout leaves little room for linen storage or ventilation upgrades. Many builders meet code with a basic 50-CFM exhaust fan, but a bathroom with a tub-shower benefits from 80 to 100 CFM to handle steam and prevent mold. If you’re remodeling, consider a fan-light combo or a separate fan on a humidity-sensing switch.
6×9 Foot Spacious Layout
Bumping up to a 6×9-foot bathroom (54 square feet) opens options for improved functionality and comfort. The extra foot of width allows a 32 or 33-inch vanity with double sinks (if desired), while the additional length accommodates a separate linen closet or built-in niche.
In this layout, the tub-shower still occupies a short wall, but the added breathing room makes it feasible to install a modern freestanding tub with an overhead shower fixture, though this requires overhead plumbing and a floor-mounted or wall-mounted tub filler. Most DIYers stick with the alcove combo for cost and simplicity.
The 6×9 footprint also permits a 36-inch-wide door instead of the tight 30-inch standard, improving accessibility and making it easier to move furniture or assist someone with limited mobility. A pocket door works well here if you’re tight on swing space, just make sure the wall cavity is deep enough (2×6 framing instead of 2×4) and doesn’t conflict with plumbing or electrical.
Ventilation improves naturally with more volume, but don’t rely on that alone. Install an exhaust fan rated for the room’s cubic footage, calculated as length × width × ceiling height in feet, then multiply by 8 air changes per hour to get the CFM requirement.
Placement Tips for Maximum Functionality
Tub-shower combos perform best against an exterior wall or a wet wall shared with a kitchen, laundry room, or second bathroom. Exterior walls simplify venting for both the exhaust fan and the plumbing stack, though insulating behind the tub becomes critical to prevent heat loss and condensation. Use closed-cell spray foam or rigid foam board rated for wet areas, not fiberglass batts, which sag and trap moisture.
Showerhead placement should center on the tub’s length, typically 30 inches from each end wall. Offset it toward the faucet end, and you’ll crowd the user: push it toward the drain end, and water won’t reach the full tub length. If you’re installing a handheld showerhead (a smart move for accessibility and pet washing), mount the slide bar at 38 to 48 inches above the tub rim so it’s usable from both seated and standing positions.
Niche and shelf placement deserves planning during framing, not as an afterthought. A recessed shower niche installs cleanly between studs (typically 14.5 inches wide in standard 16-inch on-center framing) at 48 to 54 inches above the tub deck, high enough to avoid water pooling but low enough to reach comfortably. Tiling the niche with the same material as the surround creates a clean look, but make sure to slope the bottom at least 5 degrees toward the tub for drainage.
Drain and faucet rough-in heights are governed by your tub’s specs, but standard alcove tubs position the drain 14 to 16 inches from the head wall and require hot and cold supply lines 18 to 24 inches above the subfloor, centered on the tub. Confirm these dimensions with your specific tub’s installation manual before closing up walls. Moving a drain post-installation means jackhammering concrete or cutting joists, a job that quickly escalates into four-figure territory.
Design Mistakes to Avoid When Planning Your Layout
Skipping a moisture barrier behind the tub surround ranks as the costliest oversight in DIY bathroom remodels. Even “waterproof” cement board isn’t a vapor barrier, it needs a 6-mil polyethylene sheet or a liquid-applied membrane like RedGard on all surfaces that’ll see water. Missing this step invites mold, rot, and eventual structural damage to studs and sheathing. Many experienced DIYers prefer step-by-step guides that walk through moisture barrier application in detail.
Undersized or poorly located blocking is another common failure point. Grab bars and shower doors need solid 2×6 or 2×8 blocking installed horizontally between studs, not just toggle bolts into drywall. Code requires grab bars to support 250 pounds of force in any direction. If you’re installing a frameless glass door, the hinges and handle also need blocking, those doors weigh 60 to 100 pounds and will rip straight through standard drywall anchors.
Another misstep: failing to account for tile thickness when setting the tub. Alcove tubs have a nailing flange that sits flush against studs, but once you add 1/2-inch cement board and 3/8-inch tile, your surround projects nearly an inch past the tub rim. Set the tub tight to the studs, and you’ll create a gap that traps water. Most pros shim the tub out 3/4 to 1 inch from the studs to account for the finished wall thickness, check your materials and do the math before setting the unit in mortar.
Ventilation often gets value-engineered out of tight budgets, but it’s not optional. Many jurisdictions require mechanical ventilation in bathrooms without operable windows, and even with a window, a fan is the smart move. Steam condenses on cool surfaces (mirrors, tile, fixtures), and without active exhaust, you’re growing mold inside walls and ceiling cavities you can’t see. Size the fan correctly and duct it to the exterior, never into an attic or soffit. For thorough home improvement advice, check specs against your room’s volume and expected usage.
Finally, ignoring door swing direction or forgetting to plan for storage creates daily frustration. A bathroom door that swings inward needs clearance that doesn’t overlap the toilet zone or obstruct the tub entry. If your layout is tight, a pocket door or outswing door solves the problem, just make sure an outswing door doesn’t block a hallway. Plan for at least one linen closet, medicine cabinet, or vanity with drawers: bathrooms without storage become cluttered countertop disasters within weeks.