A kitchen backsplash can completely change the look of a space, but traditional tile installation comes with grout, adhesive, and often a professional installer’s bill. Peel and stick backsplash for kitchen applications offers a smarter alternative. These self-adhesive tiles deliver the look of ceramic, subway tile, or even metal without the mess, expense, or need for specialized tools. Whether tackling a rental kitchen that needs personality or updating a dated backsplash on a budget, peel and stick tiles for kitchen backsplash projects make it possible to finish in a single afternoon, no tile saw or trowel required.
Table of Contents
ToggleKey Takeaways
- Peel and stick kitchen backsplash offers a DIY-friendly, cost-effective alternative to traditional tile, completing installations in 2–4 hours without specialized tools or professional labor.
- A peel and stick backsplash costs $1–$8 per square foot compared to $15–$35+ per square foot for ceramic tile and professional installation, delivering significant savings for budget-conscious renovators.
- Proper wall preparation—degreasing thoroughly and ensuring a level baseline—is critical to prevent tile lifting and ensure adhesion that lasts 5–7 years.
- Material choice depends on kitchen conditions: vinyl tiles work for standard areas, gel tiles mimic real grout depth, and metal options provide heat resistance ideal for areas behind cooktops.
- Quality peel and stick installations require firm pressing (preferably with a roller), careful layout planning, and sealing edges with silicone caulk near sinks to prevent moisture damage.
What Is Peel and Stick Backsplash and Why It’s Perfect for DIYers
Peel and stick backsplash consists of thin, pre-finished tiles or sheets with a pressure-sensitive adhesive backing. The installer peels off a protective liner and presses the tile directly onto the wall, no mortar, no thinset, no grout mixing. Most kitchen peel and stick backsplash tile products measure between 10″×10″ and 12″×12″, though longer subway-style strips and mosaic sheets are also common.
The adhesive backing is typically acrylic-based, designed to bond to smooth, non-porous surfaces like drywall, painted walls, or existing tile. Some premium versions use gel layers that mimic the dimensional look of real grout lines, adding depth without the maintenance.
For DIYers, the appeal is straightforward: no specialized skills, no wet saws, and no curing time. A kitchen backsplash that would take a tile pro a full day (plus grout cure time) can be installed in 2–4 hours by a first-timer with a utility knife and a level. Renters also favor peel and stick because many products remove cleanly without damaging paint, making them a low-commitment upgrade.
Top Benefits of Choosing Peel and Stick Over Traditional Tile
Speed and simplicity top the list. Traditional tile requires surface prep, layout planning, thinset application, tile setting, grouting, and sealing, often across multiple days. Peel and stick condenses that process to cleaning, measuring, and pressing. A standard 20-square-foot backsplash can be completed in an afternoon.
Cost savings are significant. Ceramic or porcelain tile runs $5–$15 per square foot for materials alone, plus thinset, grout, spacers, and tools. Professional installation adds $10–$20 per square foot in labor. Peel and stick tiles range from $1 to $8 per square foot depending on material and finish, with no additional adhesives or labor costs if installed DIY.
Reversibility makes peel and stick ideal for renters or homeowners testing a design direction. Most products can be removed by heating gently with a hairdryer to soften the adhesive, then peeling away without tearing drywall paper. This isn’t true of all brands, check manufacturer specs, but it’s a defining feature of quality vinyl and gel products.
Lower mess and disruption matter in active kitchens. No tile dust, no wet mortar, no grout haze to scrub off countertops. Many DIYers who’ve tackled budget kitchen makeovers appreciate the cleanup factor as much as the cost savings.
Fewer tools required lowers the barrier to entry. A utility knife, straightedge, tape measure, and level cover most installations. Traditional tile demands a wet saw or snap cutter, trowels, grout floats, and sponges, tools that cost money and require technique to use properly.
How to Choose the Right Peel and Stick Backsplash for Your Kitchen
Start by evaluating the wall surface. Peel and stick adheres best to smooth, clean, non-porous surfaces, freshly painted drywall (cured at least 30 days), existing ceramic tile, or laminate. Textured walls, unpainted drywall, or porous surfaces like raw wood reduce bond strength. If the wall has orange-peel texture, consider skim-coating with joint compound and sanding smooth before installation.
Consider heat exposure. The area directly behind a cooktop or range sees higher temperatures and grease splatter. Some vinyl peel and stick tiles can warp or lose adhesion above 140°F. If installing behind a stove, look for aluminum or stainless steel peel and stick options rated for heat exposure, or leave a 6″ gap and use a traditional tile or metal panel in that zone.
Moisture resistance varies by material. Kitchens see humidity, splashes, and steam. Vinyl and gel products with sealed edges handle moisture better than paper-backed or fabric-look tiles, which can delaminate if water seeps under the edge. Check product specs for “water-resistant” or “waterproof” ratings, especially near sinks.
Aesthetic and pattern matter, but don’t sacrifice function for looks. Glossy finishes show fingerprints and grease but wipe clean easily. Matte finishes hide smudges but can be harder to scrub. Subway tile patterns are timeless and forgiving for beginners: intricate mosaics require more precision in alignment.
Material Options: Vinyl, Gel, and Metal Backsplashes
Vinyl peel and stick tiles are the most affordable and widely available. They’re lightweight, easy to cut with scissors or a utility knife, and come in hundreds of patterns. Thickness ranges from 1mm to 3mm. Thicker vinyl feels more substantial and hides minor wall imperfections better. Expect a lifespan of 3–5 years with regular cleaning.
Gel or 3D peel and stick tiles add a raised, textured surface that mimics real grout lines and tile depth. The gel layer is typically polyurethane, giving a glassy, dimensional look. These cost $4–$8 per square foot but deliver a more convincing faux-tile appearance. They’re heavier than flat vinyl, so wall prep and firm pressing are critical.
Metal peel and stick backsplashes, aluminum, stainless steel, or copper-look, offer heat resistance and a modern industrial vibe. They’re stiffer and harder to cut: tin snips or a utility knife with a fresh blade work best. Metal options shine in contemporary or transitional kitchens and pair well with stainless appliances. Those exploring modern kitchen design ideas often gravitate toward brushed metal finishes for a cohesive look.
Step-by-Step Installation Guide for Flawless Results
Materials and Tools Needed:
- Peel and stick backsplash tiles (10% overage for cuts and mistakes)
- Degreasing cleaner (TSP substitute or isopropyl alcohol)
- Tape measure and pencil
- 4-foot level
- Utility knife with fresh blades
- Metal straightedge or T-square
- Scissors (for vinyl)
- Roller or J-roller for pressing (optional but recommended)
- Hairdryer (for repositioning or smoothing bubbles)
Step 1: Prep the Wall
Clean the entire backsplash area with a degreasing cleaner to remove oils, dust, and cooking residue. Grease is the enemy of adhesion. Wipe down with a damp cloth, then let dry completely, at least 30 minutes. If the wall has glossy paint, lightly scuff with 220-grit sandpaper to improve bond, then wipe clean.
Step 2: Plan Your Layout
Measure the backsplash area. Most run from countertop to the bottom of upper cabinets (typically 18″–20″ high). Dry-lay tiles on the counter to visualize pattern and plan cuts. Start at the center of the wall and work outward to keep cuts symmetrical at edges, or start at an electrical outlet or window for a natural focal point.
Mark a level horizontal line at the bottom using a 4-foot level. Countertops aren’t always level: following the counter can make tiles look crooked. A level baseline is critical.
Step 3: Install the First Row
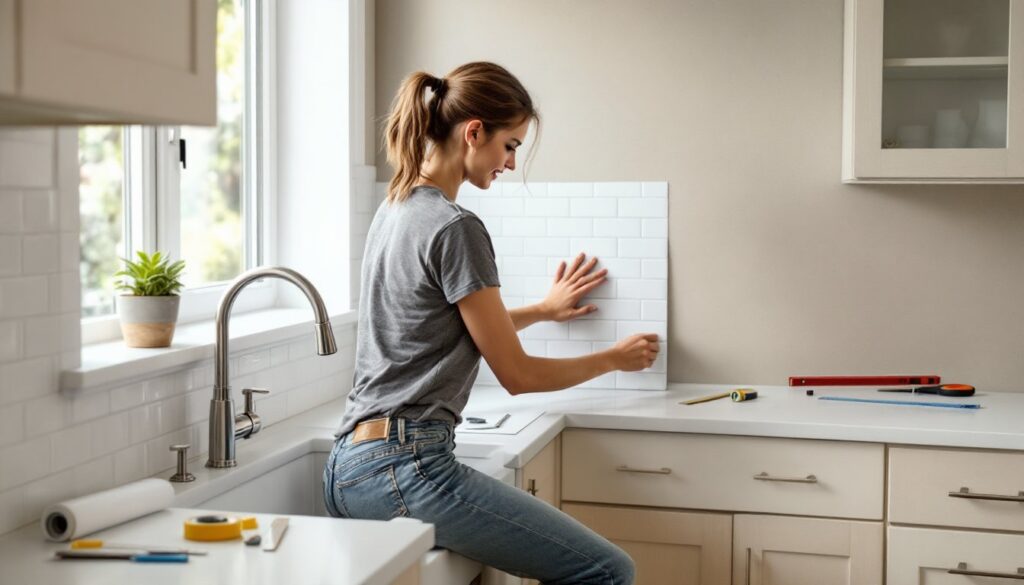
Peel the backing from the first tile, align the bottom edge with your level line, and press firmly starting from the center and working outward to avoid trapping air bubbles. Don’t reposition repeatedly, the adhesive loses tack. If adjustment is needed, lift gently and reheat slightly with a hairdryer to reactivate adhesive.
Continue across the bottom row, butting tiles tightly edge-to-edge. Some designs have printed grout lines: align those carefully. Use a roller or the flat of your hand to press firmly across the entire surface, especially edges and corners.
Step 4: Cut Tiles to Fit
For edge cuts, measure the gap, subtract 1/16″ for wiggle room, and mark on the tile back. Vinyl and gel tiles cut easily with a utility knife and straightedge, score deeply, then snap. For intricate cuts around outlets, make a cardboard template first. Metal tiles need tin snips or heavy-duty shears.
Always cut with the decorative side down to avoid chipping the finish. Wear safety glasses, metal edges are sharp.
Step 5: Work Your Way Up
Install subsequent rows, staggering seams if using a subway or brick pattern (typically offset by half a tile width). Press each tile firmly, checking alignment with your level every few rows. Air bubbles can be smoothed out by pressing with a roller or warming gently with a hairdryer and re-pressing.
Step 6: Seal Edges (Optional)
For added water resistance near sinks or behind faucets, run a thin bead of clear silicone caulk along the bottom edge where tile meets countertop, and along vertical edges at cabinets or appliances. Smooth with a wet finger. This prevents moisture from creeping under the tile.
Common Mistakes to Avoid When Installing Your Backsplash
Skipping wall prep is the #1 cause of peel and stick failure. Grease, dust, and moisture prevent adhesion. Even a thin film of cooking oil left from years of use will cause tiles to lift within weeks. Clean twice if the kitchen sees heavy use.
Installing on fresh paint before it’s fully cured. Latex and acrylic paints need 30 days to cure completely. Applying peel and stick sooner can pull paint off the wall when removing tiles. If painting, wait the full cure time.
Not pressing firmly enough. The adhesive is pressure-activated. A light touch won’t create a strong bond. Press hard across the entire tile, especially edges and corners. A J-roller applies even pressure and is worth the $5 investment.
Ignoring the baseline level. Following an out-of-level countertop makes the whole installation look crooked. Always start from a level line, even if it means a slightly tapered gap at the counter that you’ll fill with caulk.
Overheating during repositioning. A hairdryer can soften adhesive for adjustments, but too much heat on vinyl can warp the tile or melt the pattern. Use low heat and keep the dryer moving.
Cutting all tiles at once before test-fitting. Walls and cabinets aren’t always square. Cut as you go, measuring each piece individually. Those who’ve completed DIY kitchen transformations know that flexibility beats speed when fitting tiles around outlets and edges.
Maintenance Tips to Keep Your Backsplash Looking Brand New
Clean with mild dish soap and warm water. Spray on, wipe with a microfiber cloth, rinse, and dry. Avoid abrasive scrubbers or scouring powders that can scratch the finish, especially on glossy vinyl or gel tiles.
Tackle grease promptly. Cooking oils bond to surfaces over time, creating a sticky film that dulls the finish. Wipe down backsplash weekly in high-use kitchens. For built-up grease, use a 50/50 mix of white vinegar and water or a degreaser formulated for painted surfaces.
Avoid harsh chemicals. Ammonia, bleach, and acetone-based cleaners can discolor or delaminate adhesive. Stick to pH-neutral or mildly alkaline cleaners.
Check edges and seams periodically. If a corner lifts, clean the area, apply a dab of construction adhesive or double-sided carpet tape to the back, and press firmly. Catching small lifts early prevents water from seeping underneath.
Keep heat sources at safe distances. Even heat-resistant peel and stick has limits. Don’t let pot handles or steam vent directly onto tiles for extended periods. If tiles near the stove start to pucker, consider replacing that section with a metal panel or traditional tile.
Re-seal caulk joints annually. Silicone caulk along countertops and edges can crack or peel over time. Scrape out old caulk, clean the joint, and apply fresh caulk to maintain a moisture barrier.
With proper care, quality peel and stick tiles last 5–7 years before needing replacement, long enough to enjoy the look, and easy enough to swap out when tastes change or the kitchen needs a refresh.