Finding tiny red bugs crawling across your windowsill, baseboards, or walls isn’t just unsettling, it’s a sign that something outside has made its way in. These minuscule invaders often appear in huge numbers, leaving reddish streaks when crushed and raising immediate questions: Are they dangerous? Will they damage the house? And most importantly, how do you get rid of them? While most tiny red bugs are harmless pests rather than structural threats, they’re a nuisance worth addressing quickly. This guide walks through identification, elimination tactics, and prevention strategies to help homeowners regain control without calling in an exterminator for every sighting.
Table of Contents
ToggleKey Takeaways
- Tiny red bugs in house are usually harmless clover mites or chiggers that accidentally seek indoor refuge during seasonal temperature changes, not food sources or nesting sites.
- Vacuum rather than crush tiny red bugs to avoid difficult-to-remove red stains on walls and fabrics, then wipe surfaces with soapy water for complete removal.
- Seal foundation cracks, gaps around windows and doors, and utility penetrations to block entry points where tiny red bugs migrate indoors during spring and fall.
- Create an 18–24 inch vegetation-free zone around your foundation by removing mulch and ground cover, replacing them with gravel or decorative stone to deter mites.
- Apply residual insecticide or vinegar spray to the exterior foundation perimeter in early spring (March–May) and early fall (September–November) when clover mite migration peaks.
- Grade soil away from the foundation and maintain short lawn mowing practices to eliminate moisture and vegetation that attract clover mites and other outdoor pests.
What Are Those Tiny Red Bugs Crawling Around Your Home?
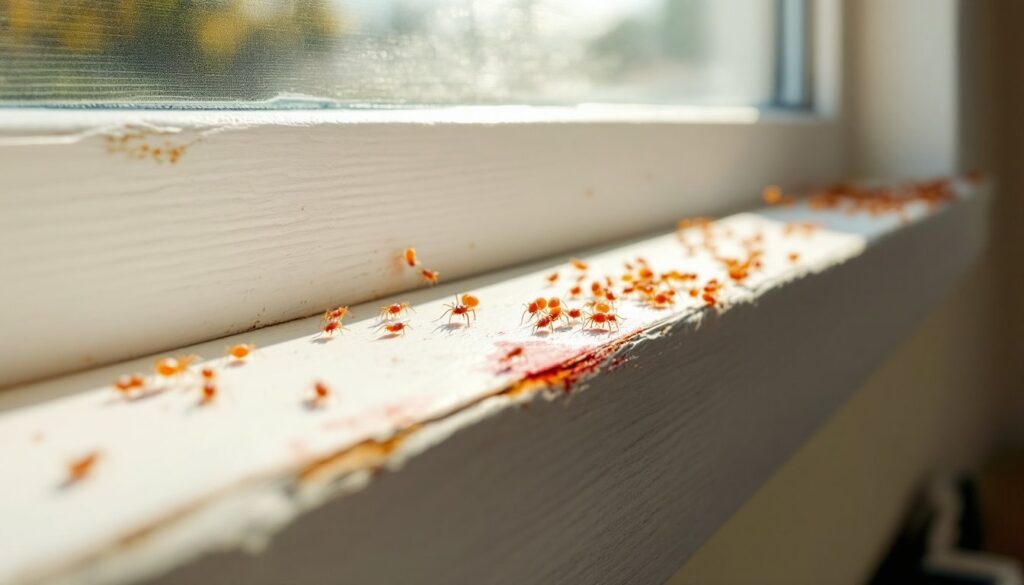
The tiny red bugs most homeowners encounter indoors are typically clover mites or, less commonly, chiggers. Both measure less than 1/30th of an inch, about the size of a pinhead, and appear as moving red or reddish-brown specks. They’re arachnids, not insects, which means they have eight legs instead of six.
Clover mites are the most frequent culprits. They feed on plant sap and grass, not human blood or household materials. When crushed, they leave a telltale red stain on walls, windowsills, or fabrics, which is plant pigment, not blood. Chiggers, by contrast, are parasitic and prefer outdoor environments but can hitch a ride indoors on clothing or pets.
Both pests thrive in specific seasonal windows and prefer exterior conditions that drive them inside. Homeowners often notice them clustered around sunny windows, door frames, or foundation cracks, especially after heavy rain or during temperature swings. Identifying which species you’re dealing with helps determine whether the problem is a temporary migration or a sign of conducive conditions around the foundation.
Common Types of Tiny Red Bugs Found Indoors
Clover Mites
Clover mites (Bryobia praetiosa) are the most common tiny red bugs in house environments, particularly in well-fertilized lawns or homes with thick turf close to the foundation. They measure about 0.75 mm long, with front legs noticeably longer than their other limbs, a key identifier under magnification. They don’t bite, sting, or carry disease, and they don’t reproduce indoors because they need plant material to survive.
Homeowners typically see them in early spring (March through May) and again in fall (September through November) when temperature shifts drive them to seek shelter. They favor the sunny side of the house, often massing on south- and west-facing walls, windowsills, and siding. Heavy populations outdoors, fed by over-watered grass, thick ground cover, or ivy, increase the likelihood of indoor migration. According to pest control experts, clover mites are more of a cosmetic nuisance than a health threat, but the red staining they leave on surfaces can be persistent if not addressed quickly.
Chiggers
Chiggers (Trombiculidae family) are larval mites that parasitize mammals, including humans, by feeding on skin cells. While they prefer outdoor habitats like tall grass, brush, and wooded areas, they can enter homes on clothing, shoes, or pets. Unlike clover mites, chiggers are nearly invisible to the naked eye and cause itchy red welts where they attach to skin.
Indoor chigger problems are rare and usually short-lived. If tiny red flying bugs in house are observed, they’re likely not chiggers, chiggers don’t fly. Instead, look for winged pests like berry bugs or aphids if flight is involved. Chiggers remain on hosts only long enough to feed (a few hours to a couple days), then drop off, so infestations don’t establish indoors the way clover mites do.
Why Tiny Red Bugs Invade Your Home (And When to Expect Them)
Tiny red bugs don’t invade homes looking for food or nesting sites, they’re accidentally seeking refuge from unfavorable outdoor conditions. Clover mites migrate indoors when their outdoor food sources dry up (hot, dry summers) or when sudden cold snaps threaten survival. Overwatering lawns or having dense ground cover like clover, ivy, or thick mulch within 18–24 inches of the foundation creates ideal breeding grounds and increases migration pressure.
Foundation cracks, gaps around windows and doors, damaged weatherstripping, and weep holes in brick veneer act as entry points. Homes with older or improperly sealed exterior envelopes are more vulnerable. Chiggers, when they do appear indoors, typically arrive on clothing or pets after outdoor activity in infested areas.
Expect clover mite activity in early spring as temperatures rise above 45°F and again in early fall as conditions cool. Populations peak quickly and can number in the thousands, creating the illusion of an infestation when in reality it’s a temporary migration. According to seasonal home maintenance guides, sealing entry points before these windows opens is the most effective prevention strategy. If you see them now, expect another wave six months out unless you address conducive conditions.
How to Get Rid of Tiny Red Bugs in Your House
Eliminating tiny red bugs requires both immediate removal and addressing outdoor sources. Here’s a practical, step-by-step approach:
1. Vacuum, Don’t Crush
Use a vacuum with a hose attachment to remove bugs from windowsills, walls, and baseboards. Do not crush them, the red stain is difficult to remove from paint, wallpaper, and fabrics. Empty the vacuum canister or bag immediately into an outdoor trash bin to prevent re-infestation.
2. Wipe Surfaces with Soapy Water
After vacuuming, wipe affected areas with a damp cloth and a few drops of dish soap. This removes remaining mites and any residue. Avoid harsh chemicals indoors, soap and water are sufficient for clover mites.
3. Treat Exterior Perimeter
Apply a residual insecticide or insecticidal soap to the foundation, window frames, door thresholds, and siding within a 10-foot band around the home. Products containing bifenthrin or cyfluthrin work well for clover mites. Follow label directions for mixing ratios and reapplication intervals. Wear gloves, goggles, and long sleeves when applying any pesticide.
For a less toxic approach, spray a solution of 1 part white vinegar to 3 parts water along entry points. This won’t kill mites on contact but deters them from crossing treated surfaces.
4. Create a Vegetation-Free Zone
Pull back mulch, ground cover, and dense plantings at least 18–24 inches from the foundation. Replace with gravel, decorative stone, or a bare soil strip. This creates a dry barrier that clover mites won’t cross and reduces moisture that attracts them.
5. Seal Entry Points
Inspect and seal:
- Cracks in foundation walls (use polyurethane or silicone caulk)
- Gaps around windows and doors (replace worn weatherstripping)
- Utility penetrations (pipes, cables, vents)
- Weep holes in brick (install weep hole screens to allow drainage while blocking pests)
A caulking gun and tube of exterior-grade sealant costs under $15 and takes an afternoon to apply around a typical single-family home.
6. Reduce Lawn Fertilization
Over-fertilized, lush lawns are clover mite magnets. Scale back nitrogen applications in spring and fall, and avoid overwatering. Let grass dry between watering cycles.
Preventing Future Infestations: DIY Tips for Homeowners
Prevention beats reactive pest control every time. Once you’ve cleared an active infestation, carry out these long-term strategies:
Maintain a Dry Foundation Perimeter
Grade soil away from the foundation at a slope of 1 inch per foot for the first 6–10 feet. This prevents water pooling and reduces moisture-loving vegetation. Clean gutters twice a year and extend downspouts at least 4–6 feet from the house to keep runoff away from the foundation.
Trim Vegetation and Remove Ground Cover
Keep grass mowed short (no taller than 3 inches) within 10 feet of the house. Remove ivy, thick mulch, and dense shrubs that trap moisture and provide mite habitat. If you prefer ground cover for aesthetics, use decorative rock or pea gravel in a 2-foot band along the foundation.
Seal and Inspect Annually
Schedule an annual exterior inspection each spring, before clover mite season peaks. Check for new cracks, gaps, or damaged seals. Reapply caulk as needed and replace worn door sweeps or weatherstripping. This is also a good time to inspect for other pest entry points like carpenter ant trails or termite tubes.
Use Residual Barrier Treatments
Apply a residual insecticide or natural repellent (like diatomaceous earth or essential oil sprays) around the foundation perimeter in early spring and early fall. Many home care resources recommend rotating products annually to prevent resistance.
Monitor and Act Early
If you see a few clover mites on a windowsill, don’t wait for thousands to appear. Vacuum immediately and inspect the exterior for entry points. Early intervention keeps populations manageable and prevents the staining damage that comes with mass die-offs indoors.
Know When to Call a Professional
If infestations persist even though sealing, treating, and managing vegetation, or if you’re dealing with a large-scale problem across multiple rooms, consult a licensed pest control professional. Structural issues, like hidden foundation cracks or drainage problems, may require a contractor’s assessment. Most DIYers can handle clover mites with the tactics above, but don’t hesitate to escalate if the problem exceeds your comfort level or available time.